前言
由于浏览器插件 Proxy SwitchyOmega 仅支持 HTTP、HTTPS 和 SOCKS5 协议的代理,于是在其中选择最为安全的 HTTPS 协议进行中转。
该博文仅作为笔记用途。
方案概述
-
自签有效期 10 年的 SSL 证书。
注意:如果你和我一样之后要在
SwitchyOmega等浏览器插件上使用代理,那么使用自签证书进行加密的话,除了再客户端上信任证书,还需要用--ignore-certificate-errors参数启动浏览器,这将带来潜在的安全风险!
如果你的服务器有域名,可以使用certbot申请免费的域名证书,或是去腾讯云、阿里云等云服务厂商处购买证书。
而如果你的服务器只有外部 IP,则可以去 ZeroSSL 申请免费的证书,不过有效期只有 90 天,需要定期更新,具体教程可以参考:ZeroSSL 申请免费的 IP SSL 证书。 -
Docker 容器内运行小猫咪并在(容器内的)
8910端口提供需要认证的 HTTP 和 SOCKS5 代理服务。 -
Docker 容器内使用
stunnel在443端口提供 HTTP over TLS(即 HTTPS)正向代理服务,并通过转发链将请求转发至小猫咪的8910端口。证书就使用自签发的。 -
在 Linux 宿主机上部署容器,并将宿主机的
443端口映射容器的443端口。
证书的读取通过为容器映射宿主机的路径/文件,必要时重启容器实现读取新证书的功能。 -
使用时需要在客户端机器上安装 SSL 证书。
非自签证书可以跳过这一步。
操作步骤
一、自签有效期 10 年的 SSL 证书
这一步的目的是生产一个由 CA 公钥和私钥拼接而成的
stunnel.pem文件,用以给stunnel使用。
如果你有其他方式获取证书,可以跳过生成阶段,直接进行证书拼接并拷贝至/rab/docker/https_proxy/config/ssl/stunnel.pem。
生成之前保险起见,更新下服务器的依赖环境:
sudo apt-get update
sudo apt-get install openssl
# 推荐接下来的指令都在 /root/ssl_generator/ 目录执行
mkdir -vp /root/ssl_generator/
cd /root/ssl_generator/
生成私钥,运行以下命令生成一个 2048 位的 RSA 私钥:
# 目标文件 private.key
openssl genpkey -algorithm RSA -out private.key -pkeyopt rsa_keygen_bits:2048
生成 CA 证书:
# 目标文件 ca.crt
openssl req -new -x509 -key private.key -out ca.crt -days 3650
注意其他信息都可以乱填,但是
Common Name需要与服务器的 IP 一致。
否则会出现以下错误:curl: (60) SSL: unable to obtain common name from peer certificate More details here: https://curl.se/docs/sslcerts.html curl failed to verify the legitimacy of the server and therefore could not establish a secure connection to it. To learn more about this situation and how to fix it, please visit the web page mentioned above.curl: (60) SSL: certificate subject name 'xxx.xxx.xxx.xxx' does not match target host name '(nil)' More details here: https://curl.se/docs/sslcerts.html curl failed to verify the legitimacy of the server and therefore could not establish a secure connection to it. To learn more about this situation and how to fix it, please visit the web page mentioned above.
生成证书签发请求:
# 目标文件 csr.csr
openssl req -new -key private.key -out csr.csr
自签发证书:
# 目标文件 certificate.crt
openssl x509 -req -days 3650 -in csr.csr -signkey private.key -out certificate.crt
将文件都转为 PEM 格式:
openssl x509 -in ca.crt -out ca.pem -outform PEM
openssl x509 -in certificate.crt -out certificate.pem -outform PEM
openssl rsa -in private.key -out private.pem -outform PEM
生成完成之后,就能得到一个 10 年的自签发证书了:
- CA 证书 (CA Certificate):
ca.pem - 私钥 (Private Key):
private.pem - 证书 (Certificate):
certificate.pem - 证书签发请求 (Certificate Signing Request):
csr.csr
重要的是证书、CA 证书和私钥,证书签发请求之后就用不到了。
之后合并下证书、CA 的公钥和私钥,注意顺序!后续给 stunnel 使用:
# 最终的 stunnel.pem 文件自上而下依次是:证书、CA 证书和私钥
cat /root/ssl_generator/certificate.pem /root/ssl_generator/ca.pem /root/ssl_generator/private.pem >> /root/ssl_generator/stunnel.pem
二、启动容器并设置好端口、目录映射
映射关系:
| 宿主机端口 | 容器内端口 | 备注 |
|---|---|---|
| 443 | 443 | 由容器内 stunnel 提供的对外的 HTTPS 代理接口 |
| 宿主机目录 | 容器内目录 | 备注 |
|---|---|---|
| /rab/docker/https_proxy/config/cat/ | /root/cat/ | 存放小猫咪配置文件 |
| /rab/docker/https_proxy/config/ssl/ | /root/ssl/ | 存放 SSL 证书等 |
先在宿主机建立映射用的目录:
mkdir -vp /rab/docker/https_proxy/config/cat/
mkdir -vp /rab/docker/https_proxy/config/ssl/
拷贝一份生成的证书到映射目录中:
cp -r /root/ssl_generator/* /rab/docker/https_proxy/config/ssl/这里使用的原版的 Ubuntu 20.04 系统镜像作为基础容器:
docker run -it \
  --name=dev_my_https_proxy \
  -p 443:443 \
  -v /rab/docker/https_proxy/config/cat/:/root/cat/ \
  -v /rab/docker/https_proxy/config/ssl/:/root/ssl/ \
  ubuntu:20.04
因为使用了
-it参数,所以容器启动后会直接进入容器内的交互模式。
之后更新下系统并安装必要的软件:
apt-get update
apt-get install wget
# 以下 2 个是调试用的
apt-get install curl
apt-get install vim
三、下载小猫咪并迁移至容器
Ubuntu 22.04 系统下可用的小猫咪:clash
来源于我对官方 Clash 容器的备份与可执行文件的提取。
下载可执行文件并赋予执行权限:
cd /root/
# 在容器内下载小猫咪
wget https://github.com/senjianlu/Clash-Docker/raw/master/backup/clash
chmod +x /root/clash
默认情况下小猫咪会读取 /root/.config/clash/ 中的配置文件,因此这里还需要下载配置文件:
mkdir -vp /root/.config/clash/
cd /root/.config/clash/
# 在容器内下载配置文件
wget https://github.com/senjianlu/Clash-Docker/raw/master/backup/Country.mmdb
wget https://github.com/senjianlu/Clash-Docker/raw/master/backup/cache.db
wget https://github.com/senjianlu/Clash-Docker/raw/master/backup/config.yaml
四、启动小猫咪并测试 HTTP 和 SOCKS5 代理服务
先启动下试试:
./clash
配置文件的模板就不提供了,自行机场下载。
注意 mixed-port 配置为 8910,并让所有请求都走代理。
同时还需要添加用以认证的 authentication 配置。
配置文件参考:
port: 7890
socks-port: 7891
redir-port: 7892
mixed-port: 8910
authentication:
  - "testUser:testPasswordForHttpsProxy"
allow-lan: true
mode: Rule
log-level: info
external-controller: :9090

proxies:
  - {name: my_node, server: aabbcc.com, port: 12345, type: vmess, uuid: xxxxx-xxxxxx-xxxxxx-xxxxx, udp: true}

rules:
  - MATCH,my_node
这里需要注意的是需要手动指定其读取 /root/cat/ 下的配置文件:
./clash -f /root/cat/config.yaml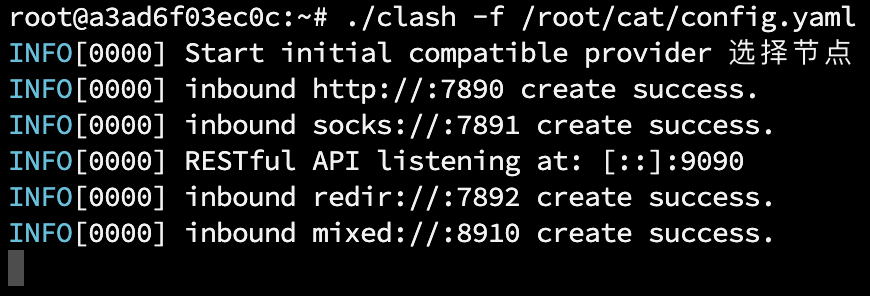
启动没问题,就改为使用 nohup 让其运行在后台:
nohup ./clash -f /root/cat/config.yaml &测试配置文件中的 mixed-port 端口上的 HTTP 或 SOCKS5 代理是否可用:
curl -x http://testUser:testPasswordForHttpsProxy@127.0.0.1:8910 http://ip.sb
curl -x socks5://testUser:testPasswordForHttpsProxy@127.0.0.1:8910 http://ip.sb
如果不可用,只有可能是你的节点或测试命令有问题,请遵循以下步骤进行检查:
- 在其他设备上测试配置文件,或用其他方式测试节点是否在正常工作。
- 在容器内通过
curl、ping等命令检测该主机与节点host的连通性,检查可能存在的 DNS 污染或网络阻断的问题。- 检查配置文件中的
port、socks-port和mixed-port等端口是否和测试命令中的一致。
五、安装 stunnel 并创建配置文件
安装很简单:
apt-get install stunnel需要创建配置文件 /etc/stunnel/stunnel.conf:
vi /etc/stunnel/stunnel.conf配置文件内容:
client = no
[squid]
accept = 443
connect = 127.0.0.1:8910
cert = /root/ssl/stunnel.pem
六、使用 stunnel 启动 HTTP over TLS (HTTPS) 代理服务并测试
启动 stunnel:
stunnel在宿主机上测试一下:
# 注意这里的 IP 就需要使用生成 SSL 证书时填的 Common Name 了
curl --proxy-cacert /root/ssl_generator/ca.pem -x https://testUser:testPasswordForHttpsProxy@$your_ip_in_ssl_common_name:443 http://ip.sb
七、为客户端安装 SSL 证书
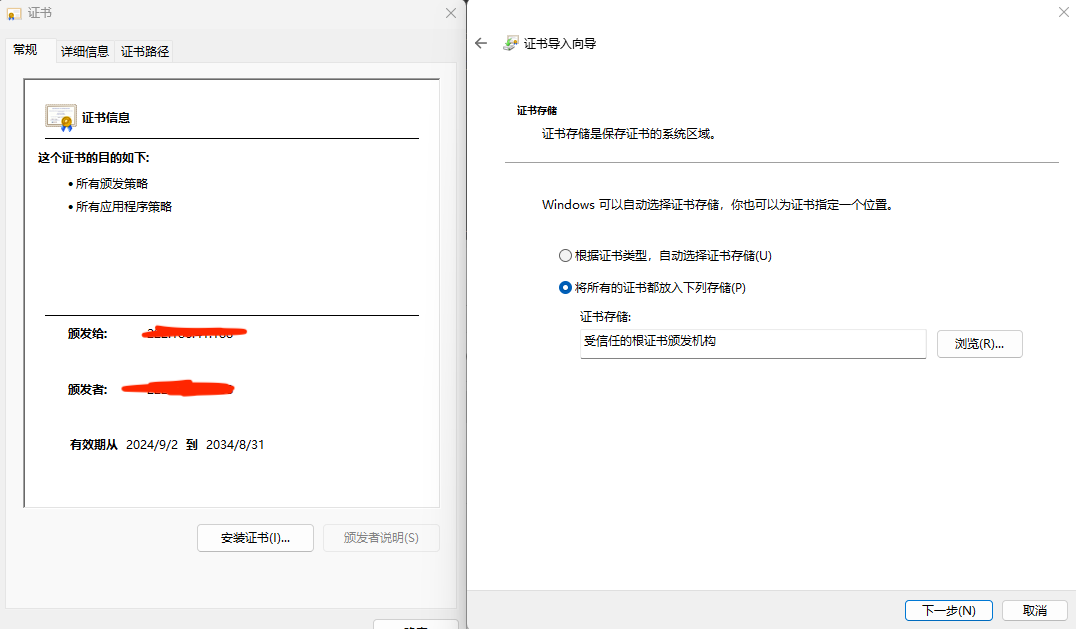
下载 CA 证书 ca.crt,或者下载 ca.pem 并在本地改为 .crt 后缀。
之后的安装(信任)流程可以参考:各个系统下证书的信任流程
注意:如果是在 Windows 下的话,需要将证书放入“受信任的根证书颁发机构”中。
九、在客户端上测试 HTTPS 代理服务
我这里使用的是 SwitchyOmega 浏览器插件:
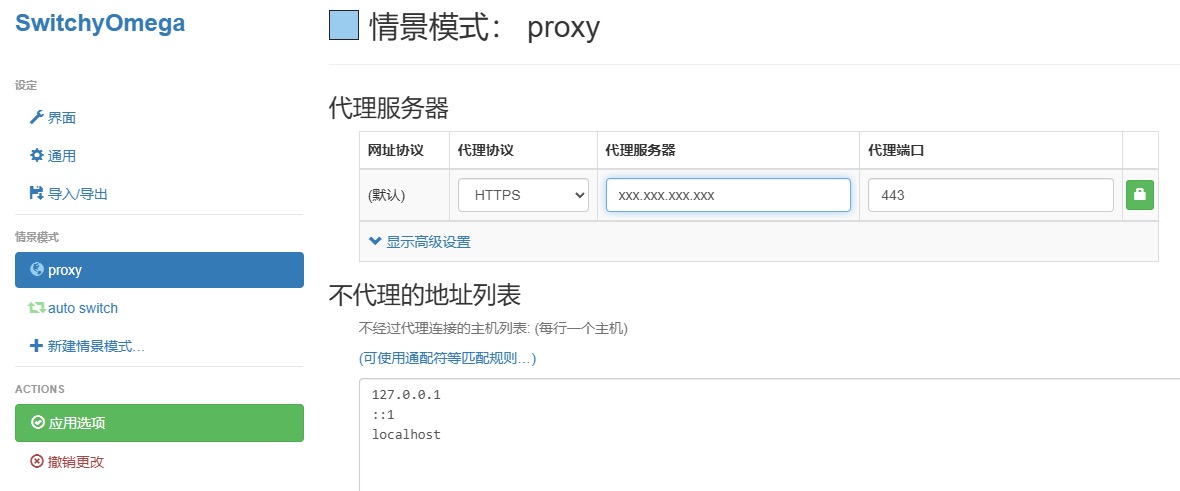
需要注意的是,如果使用自签证书会出现无法连接的错误 ERR_PROXY_CERTIFICATE_INVALID:
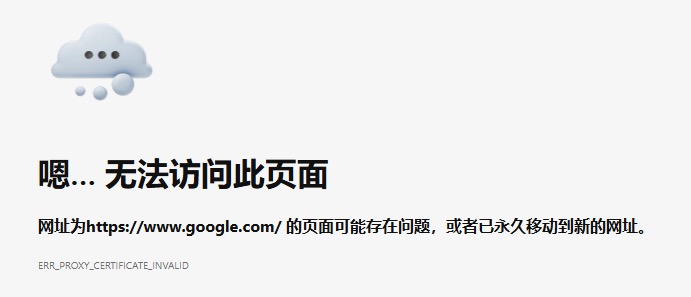
需要在 Edge 的快捷方式处添加 --ignore-certificate-errors 参数:
"C:\Program Files (x86)\Microsoft\Edge\Application\msedge.exe" --ignore-certificate-errors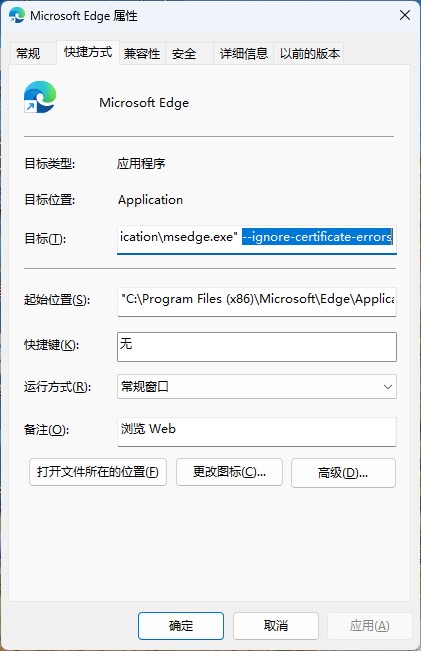
构建成易用的 Docker 镜像
一、整理后的 Dockerfile 内容
# 基础镜像系统版本为 ubuntu:20.04
FROM ubuntu:20.04

# 维护者信息
LABEL maintainer="Rabbir admin@cs.cheap"

# Docker 内用户切换到 root
USER root

# 设置时区为东八区
ENV TZ Asia/Shanghai
RUN ln -snf /usr/share/zoneinfo/$TZ /etc/localtime > /etc/timezone

# 安装依赖
RUN apt-get update -y
RUN apt-get install wget -y
RUN apt-get install curl -y

# 下载 Clash 和其配置文件
RUN mkdir -vp /root/cat/
WORKDIR /root/
RUN wget https://github.com/senjianlu/Clash-Docker/raw/master/backup/clash
RUN chmod +x /root/clash
# 配置文件
RUN mkdir -vp /root/.config/clash/
WORKDIR /root/.config/clash/
RUN wget https://github.com/senjianlu/Clash-Docker/raw/master/backup/Country.mmdb
RUN wget https://github.com/senjianlu/Clash-Docker/raw/master/backup/cache.db
RUN wget https://github.com/senjianlu/Clash-Docker/raw/master/backup/config.yaml

# 安装 stunnel
RUN mkdir -vp /root/ssl/
WORKDIR /root/
RUN apt-get install stunnel -y
# 编辑配置文件
RUN echo "client = no" > /etc/stunnel/stunnel.conf
RUN echo "[squid]" >> /etc/stunnel/stunnel.conf
RUN echo "accept = 443" >> /etc/stunnel/stunnel.conf
RUN echo "connect = 127.0.0.1:8910" >> /etc/stunnel/stunnel.conf
RUN echo "cert = /root/ssl/stunnel.pem" >> /etc/stunnel/stunnel.conf

# 安装 httpd 以映射证书认证文件
RUN apt-get install apache2 -y
# 创建认证文件存放用的目录
RUN mkdir -vp /root/ssl/.well-known/
RUN mkdir -vp /var/www/html/
# 建立软链接
RUN ln -s /root/ssl/.well-known /var/www/html

# 下载 Seafile 脚本到容器
WORKDIR /root/
RUN wget https://raw.githubusercontent.com/senjianlu/seafile-scripts/master/download.sh

# 拷贝 entrypoint.sh 到容器
COPY entrypoint.sh /root/entrypoint.sh

# 指定启动的时候执行 entrypoint.sh
ENTRYPOINT ["/bin/sh", "/root/entrypoint.sh" ]
entrypoint.sh 核心的启动命令:
# 4. 启动
# 4.1 启动 apache2(后台运行)
apachectl -D FOREGROUND &
# 4.2 启动 stunnel(后台运行)
stunnel
# 4.3 启动 clash
cd /root/ && ./clash -f /root/cat/config.yaml
二、由 GitHub Action 自动构建
GitHub 仓库:senjianlu/Https-Proxy-Docker
三、镜像拉取和运行
- Docker Hub 地址:rabbir/https-proxy
- 按照 GitHub 文档描述启动镜像:
docker run -d \
  --name=my_https_proxy \
  -p 80:80 \
  -p 443:443 \
  -v /rab/docker/https_proxy/config/cat/:/root/cat/ \
  -v /rab/docker/https_proxy/config/ssl/:/root/ssl/ \
  rabbir/https-proxy:latest
如果在境内无法拉取镜像,请手动下载镜像并上传至服务器、之后进行加载:
# 在境外服务器上拉取镜像并打包为 rabbir_https_proxy.tar docker pull rabbir/https-proxy:latest docker save -o rabbir_https_proxy.tar rabbir/https-proxy:latest # 在境内服务器上加载 rabbir_https_proxy.tar docker load < rabbir_https_proxy.tar - 通过容器内的小猫咪日志可以检查运行状态:
docker logs my_https_proxy
参考文章: